
Introduction
Discover the ease and deliciousness of Alice Springs Chicken—a dish that brings together the irresistible flavors of tender chicken, crispy bacon, and melty cheese, all tied together with a tangy honey mustard sauce. This one-pan meal takes inspiration from the famed Outback Steakhouse favorite and transforms it into a quick, homemade recipe that’s perfect for busy weeknights. In this post, we’ll explore how you can create this mouth-watering dish using simple ingredients and straightforward techniques that guarantee a satisfying, flavor-packed dinner with minimal cleanup. Whether you’re a seasoned cook or just starting out, this guide will help you master every step of making an unforgettable Alice Springs Chicken at home.
Recipe Overview and Inspiration
The origin of Alice Springs Chicken is tied to the Outback Steakhouse, but did you know it has its own unique backstory? Read more about the history of Alice Springs Chicken here and discover its journey from restaurant favorite to home-cooked classic.

The Story Behind Alice Springs Chicken
Alice Springs Chicken blends culinary creativity with a dash of Australian flair. Its name hints at the town of Alice Springs, but the dish offers a playful twist on classic chicken recipes. This recipe embodies adventure and bold flavors like those at Outback Steakhouse.
The dish mixes tender chicken breasts with crispy bacon, melty cheese, and a tangy honey mustard sauce. It delivers comfort with every bite and excites food lovers with its sophisticated taste. As a one-pan meal, it suits busy weeknights and reduces cleanup time.
Alice Springs Chicken shows how culinary traditions evolve. Chefs reinvent classic recipes to fit modern tastes and lifestyles. Whether you are a beginner or an experienced cook, try this creative take on a familiar favorite. It combines innovation with the charm of fuss-free cooking.
What Makes a One-Pan Meal Special
A one-pan meal simplifies dinner preparation and cleanup. With fewer dishes to wash, you spend less time in the kitchen and more time enjoying your meal. This style of cooking saves energy and reduces stress.
One-pan meals also promote flavor blending. Ingredients roast together in the same vessel. This process melds spices, herbs, and juices, creating a rich and balanced taste. Every bite bursts with the combined aromas of each element.
Moreover, one-pan recipes are versatile and practical. They fit busy lifestyles and make mealtime planning easier. By using a single pan, you streamline cooking and free up time for other activities. This method also minimizes the risk of overcooking or burning separate components.
Finally, these meals encourage creativity. You can experiment with different ingredients in the same pan to produce unique flavor profiles. The simplicity of one-pan cooking opens opportunities to innovate, making every dinner an exciting culinary adventure.
Keyword & Entity Focus
Using the right keywords and entities can boost your content’s visibility and relevance. For this recipe, focus on terms like “Alice Springs Chicken”, “one-pan meal”, and “easy chicken dinner”. These keywords draw readers who search for quick, delicious recipes and help search engines identify your post as a valuable resource.
Incorporate related keywords such as “Outback Steakhouse copycat”, “cheesy bacon chicken”, and “honey mustard sauce recipe”. These LSI keywords build context and signal to search engines that your post covers a range of relevant topics.
Entities like chicken, bacon, cheese, and honey mustard also play a crucial role. They create a semantic relationship that improves your content’s authority. Mentioning Outback Steakhouse and one-pan cooking helps link your post to well-known culinary concepts.
By carefully integrating these keywords and entities, you enhance your post’s SEO. You make your content more discoverable, encourage reader engagement, and ensure that both search engines and users quickly understand what your recipe is all about.
Essential Ingredients
Primary Ingredients
The ingredients in Alice Springs Chicken are simple, but they pack a flavorful punch. Each one adds something unique—whether it’s texture, richness, or a boost of savory goodness.
Chicken Breasts
Chicken breast is the star of this dish. It’s lean, high in protein, and mild in flavor, which makes it perfect for soaking up sauces and toppings. When cooked right, it stays juicy and tender. That makes it an ideal base for bold additions like bacon, cheese, and honey mustard.
Bacon
Bacon brings a smoky, salty crunch that balances the creamy and sweet elements of the dish. As it cooks, it releases flavorful fat that adds depth to the chicken. The crispy texture also adds a nice contrast to the tender meat and melty cheese.
Cheese
Cheese ties everything together. A mix of cheddar and Monterey Jack is often used, creating a balance between sharp and creamy. When it melts, it forms a gooey layer that holds the other ingredients in place. It also adds rich, comforting flavor to every bite.
Honey Mustard Sauce
This sauce is the signature element of Alice Springs Chicken. The honey adds sweetness, while the mustard brings a tangy kick. Together, they create a bold and balanced flavor. The sauce also keeps the chicken moist as it bakes, locking in all that savory goodness.
Sauce Components
The honey mustard sauce is the flavor foundation of Alice Springs Chicken. It’s sweet, tangy, and just a little bit spicy—exactly what makes this dish so crave-worthy. This sauce isn’t just for topping; it soaks into the chicken while it bakes, adding moisture and bold flavor.
Honey
Honey provides the natural sweetness that balances the sharper flavors in the sauce. It also helps create a smooth texture and golden color when baked. Use pure, raw honey for the best taste and richness.
Dijon Mustard
Dijon mustard adds a zesty kick. It’s less vinegary than yellow mustard and offers a smoother, more refined flavor. Dijon blends well with honey and adds complexity to the sauce without overpowering it.
Mayonnaise
Mayonnaise acts as a creamy base. It gives the sauce a velvety texture and helps bind everything together. It also enhances the sauce’s richness and gives it a full-bodied taste that pairs perfectly with baked chicken.
Lemon Juice (Optional)
A splash of fresh lemon juice can brighten the sauce. It adds a little acidity that cuts through the sweetness and richness, giving the overall dish a more balanced flavor.
Together, these simple ingredients create a sauce that’s sweet, tangy, creamy, and perfectly blended. It’s the kind of sauce that turns ordinary baked chicken into something truly unforgettable—and it’s one of the reasons Alice Springs Chicken is such a beloved recipe.
Supporting Ingredients
While the main stars of Alice Springs Chicken are the chicken, bacon, cheese, and honey mustard sauce, the supporting ingredients play a vital role in enhancing flavor, texture, and balance. These simple additions help bring the dish to life and tie everything together.
Seasonings
Basic spices like salt, black pepper, paprika, and garlic powder are essential. They add depth and help build a flavorful base before the chicken even hits the pan. Paprika adds a subtle smokiness, while garlic powder brings a warm, savory note that blends beautifully with the sauce.
Olive Oil or Butter
A small amount of olive oil or butter helps with searing the chicken and boosting the overall richness of the dish. Olive oil adds a lighter, slightly fruity flavor, while butter gives a creamy, indulgent finish. Either choice will keep the chicken moist and golden during cooking.
Sliced Mushrooms (Optional but Recommended)
Mushrooms aren’t always included in every Alice Springs Chicken recipe, but they’re a great addition. They add an earthy, meaty texture that complements the smoky bacon and sweet honey mustard sauce. When sautéed, mushrooms absorb flavor and help balance the richness of the cheese and sauce.
Fresh Herbs (for Garnish)
A sprinkle of chopped parsley or green onions on top gives the dish a fresh, colorful finish. Herbs add brightness and contrast to the rich, baked layers. They also make your final presentation more visually appealing—perfect for impressing guests or elevating a weeknight dinner.
These supporting ingredients may seem small, but they bring flavor complexity and balance to the dish. They round out the recipe and help transform a few basic items into a restaurant-style meal that’s both satisfying and memorable.
Health and Quality Tips
Alice Springs Chicken is indulgent, but with a few smart choices, you can enjoy it without sacrificing nutrition or flavor. Paying attention to ingredient quality and preparation methods can make this dish healthier and even more delicious.
Choose Lean, High-Quality Chicken
Start with fresh, boneless, skinless chicken breasts. Look for organic or free-range chicken when possible. These options tend to have better texture and flavor and are raised without antibiotics or hormones. Trimming excess fat also helps reduce overall calories.
Use Low-Sodium Bacon and Cheese
Bacon and cheese add richness, but they’re also high in sodium. Look for reduced-sodium or nitrate-free bacon, and opt for cheeses with fewer additives. Shredding your own cheese instead of using pre-packaged blends avoids unnecessary preservatives and improves melt quality.
Make a Lighter Sauce
You can lighten the honey mustard sauce without losing flavor. Use Greek yogurt or low-fat mayo instead of full-fat mayonnaise. You’ll cut down on saturated fats while keeping the sauce creamy and tangy. For extra health points, use raw honey and Dijon mustard with no added sugars.
Watch Portion Sizes
It’s easy to overdo it with cheesy, saucy dishes. Stick to a single serving size—around 4 to 6 ounces of chicken per person. Pair the dish with a side of steamed vegetables or a fresh salad to create a balanced, satisfying meal.
Avoid Overcooking
Overcooked chicken becomes dry and tough, reducing both taste and nutrition. Use a meat thermometer and cook the chicken to an internal temperature of 165°F (74°C). This ensures safety without drying out the meat.
By making a few intentional choices, you can enjoy the bold, comforting flavors of Alice Springs Chicken with more nutritional balance. It’s all about using quality ingredients and thoughtful preparation.
Step-by-Step Preparation
Prepping the Chicken
Properly prepping the chicken is key to making your Alice Springs Chicken juicy, flavorful, and tender. Taking just a few extra steps before cooking ensures your dish turns out restaurant-quality every time.

1. Choose Uniform Chicken Breasts
Start by selecting boneless, skinless chicken breasts of similar size. Uniform pieces cook more evenly, preventing some from drying out while others are still undercooked. If your chicken pieces are too thick, slice them horizontally or gently pound them to an even thickness using a meat mallet or rolling pin. Aim for about ½ to ¾ inch thick.
2. Pat Dry for Better Searing
Before seasoning, use paper towels to pat the chicken dry. Removing surface moisture helps the chicken sear properly. This results in a golden-brown crust and seals in the juices during cooking.
3. Season Generously
Don’t be shy with the seasoning. A mix of salt, pepper, garlic powder, and paprika adds depth and highlights the natural flavor of the chicken. You can also add a pinch of onion powder or a dash of cayenne pepper if you prefer a little heat. Season both sides evenly for balanced flavor in every bite.
4. Optional Marinade for More Flavor
For even more flavor, marinate the chicken in a small amount of the honey mustard sauce for 30 minutes to an hour before cooking. This helps tenderize the meat and lets the tangy sweetness infuse into the chicken. Just be sure to discard any used marinade and use fresh sauce for baking.
5. Pan-Sear Before Baking
While the dish finishes in the oven, a quick pan-sear creates a flavorful crust and locks in moisture. Heat a bit of olive oil or butter in a skillet and sear the chicken for 2–3 minutes per side until golden. This extra step gives your Alice Springs Chicken that irresistible, restaurant-style texture.
Proper chicken prep may only take a few minutes, but it makes a big difference in flavor and consistency. These simple steps help create a chicken base that’s tender, juicy, and ready to absorb all the delicious toppings and sauce.
Bacon and Cheese Integration
Bacon and cheese are two of the most crave-worthy elements in Alice Springs Chicken. When used the right way, they turn this dish from a simple chicken bake into a decadent, layered meal full of rich textures and bold flavors.
1. Cook Bacon Until Crispy, Not Burnt
Start by cooking the bacon until it’s crispy but not overly crunchy or burnt. Crisp bacon adds an irresistible texture and smoky flavor to every bite. You can pan-fry it, bake it in the oven, or even air-fry it—just be sure to drain excess grease on a paper towel. This step also keeps the chicken from getting soggy when baked.
2. Crumble or Slice for Easy Layering
Once cooled, crumble or slice the bacon into bite-sized pieces. Crumbling works best if you want the bacon evenly spread over the chicken. Slicing into strips can make each bite feel heartier. Either method ensures you get that salty crunch in every forkful.
3. Use a Cheese Blend for Maximum Flavor
A mix of cheddar and Monterey Jack is the traditional choice for Alice Springs Chicken. Cheddar brings sharp, bold flavor, while Monterey Jack adds creaminess and smooth melt. Shred the cheese yourself if possible—pre-shredded cheese contains anti-caking agents that can affect how it melts.
4. Layer Thoughtfully for the Best Melt
After the chicken is cooked or seared, add a layer of bacon, then generously sprinkle the shredded cheese on top. Doing bacon first keeps it from drying out in the oven, while placing the cheese last helps it melt evenly and hold everything together. The cheese acts like a golden, gooey blanket that ties the entire dish together.
5. Broil for Extra Gooeyness (Optional)
To finish with a restaurant-style touch, place the dish under the broiler for 1–2 minutes after baking. This step gives the cheese a bubbly, golden top and helps fuse the bacon and chicken together in one mouthwatering layer.
Perfect bacon and cheese integration adds a wow factor to your Alice Springs Chicken. It’s not just about flavor—it’s about texture, melt, and making each layer shine in harmony.
Creating the Signature Sauce
The honey mustard sauce is what gives Alice Springs Chicken its unique, crave-worthy flavor. It’s creamy, sweet, tangy, and just a little zesty—all rolled into one. And the best part? You can easily make it at home with just a few ingredients. This signature sauce is the flavor anchor for the entire dish.
1. Start with High-Quality Ingredients
The sauce only uses a handful of items, so choosing quality ingredients makes a difference. Use real honey, not syrup blends. Go for Dijon mustard over yellow for a smoother, more sophisticated flavor. Pick a good-quality mayonnaise—one that’s creamy without being overly oily or artificial.
2. Balanced Flavors Are Key
To make the base, combine equal parts Dijon mustard and honey in a bowl. The honey brings natural sweetness, while the mustard adds a tangy kick. Next, stir in mayonnaise. This ingredient adds body and richness, transforming the mix into a thick, pourable sauce.
If you like a touch of brightness, squeeze in a bit of fresh lemon juice. It cuts through the sweetness and brings balance to the sauce, making it pop without overpowering the other flavors.
3. Adjust the Ratio to Taste
Everyone’s taste is different, so feel free to tweak the ratio of honey to mustard. If you like your sauce sweeter, add a little more honey. Prefer it tangy? Increase the mustard slightly. A dash of garlic powder or black pepper can also deepen the flavor and add a savory note.
4. Mix Until Smooth and Store Properly
Whisk all ingredients together until the sauce is smooth and well blended. You can use it right away, or let it chill in the fridge for 30 minutes to help the flavors meld. The sauce keeps well for up to five days when stored in an airtight container.
This homemade honey mustard sauce does more than top the chicken—it elevates the entire dish. It brings balance to the rich bacon and cheese and infuses the chicken with flavor from the inside out.
Efficient One-Pan Setup
One of the biggest perks of making Alice Springs Chicken is its one-pan preparation. This approach saves time, simplifies cleanup, and keeps all the flavors locked in. A one-pan meal doesn’t just make cooking easier—it also helps each ingredient blend into a perfectly balanced bite.
1. Choose the Right Pan
Start with a large oven-safe skillet or a deep baking dish. Cast iron or heavy-duty stainless steel pans work best. They heat evenly, hold warmth well, and go straight from stovetop to oven. Make sure the pan is large enough to hold all the chicken breasts flat without overlapping. Crowding the chicken prevents it from cooking evenly and searing properly.
2. Sear First, Bake Second
Using one pan means you can sear and bake in the same place. Start by searing the seasoned chicken in a bit of olive oil or butter until it gets a golden crust. This step builds flavor and helps lock in moisture. After searing, remove the pan from heat and begin layering the toppings directly over the chicken—no need to transfer to another dish.
3. Layer and Bake Without the Mess
Once the chicken is seared, add the honey mustard sauce, crispy bacon, and shredded cheese. If you’re using mushrooms, sauté them first in the same pan to build even more flavor. Everything stays in one place, meaning fewer dishes and more efficient prep. Bake the chicken right in the same skillet, letting the sauce and cheese bubble into a delicious, golden finish.
4. Bonus: Easier Cleanup and Better Flavor
The one-pan setup captures all the juices and browned bits left from searing. These flavorful drippings enrich the sauce during baking. And when dinner’s done, cleanup is a breeze—especially if you’ve used a nonstick or cast-iron pan that’s well-seasoned.
The efficient one-pan method makes Alice Springs Chicken a perfect choice for busy weeknights or casual entertaining. It minimizes effort without sacrificing taste, so you can spend more time enjoying the meal and less time doing dishes.
Cooking Process and Techniques
Baking/Oven Roasting Tips
Once you’ve assembled your Alice Springs Chicken, the oven does the rest of the work. But a few smart baking techniques can take your dish from good to great. These tips ensure juicy chicken, perfectly melted cheese, and that classic golden finish every time.
1. Preheat the Oven Fully
Always preheat your oven before baking. Set it to 375°F (190°C), which is the ideal temperature for fully cooking the chicken while keeping it moist. A properly heated oven also helps the cheese melt evenly and gives the sauce a rich, baked texture.
2. Use a Meat Thermometer
To avoid overcooking or undercooking, use a digital meat thermometer. Insert it into the thickest part of the chicken breast. Remove the dish from the oven when the internal temperature reaches 165°F (74°C). This guarantees that your chicken is safe to eat and still juicy.
3. Cover for Moisture, Uncover for Finish
If your chicken starts to brown too quickly or your pan seems dry, lightly cover it with foil during the first half of baking. This helps trap steam and retain moisture. Then, uncover the pan for the last 5–10 minutes. This lets the cheese bubble and turn golden without drying out the meat.
4. Rest Before Serving
Once the chicken is done, let it rest in the pan for 5 minutes before serving. This short wait allows the juices to redistribute evenly throughout the meat. It also gives the cheese and sauce a chance to settle into a thicker, clingier texture—perfect for scooping up every bite.
5. Broil at the End (Optional)
For an extra touch of restaurant-style finish, switch the oven to broil for the last 1–2 minutes. Keep a close eye on it during this step—broiling can quickly go from golden to burnt. A brief broil crisps the cheese and gives it a slightly toasted flavor.
Baking Alice Springs Chicken correctly ensures you get tender, flavorful meat under a blanket of melty cheese and smoky bacon. When done right, it’s a dish that looks and tastes like it came from a steakhouse—without ever leaving your kitchen.
Ensuring Juicy and Flavorful Chicken
No one wants dry, bland chicken—especially in a dish as rich and indulgent as Alice Springs Chicken. The key to a great result lies in locking in moisture and maximizing flavor from the start. Here’s how to make sure every bite of chicken is tender, juicy, and packed with taste.
1. Start with Evenly Sized Chicken Breasts
Uniformity is essential for even cooking. Use boneless, skinless chicken breasts that are similar in size. If some pieces are much thicker than others, butterfly them or gently pound them to about ½ to ¾ inch thickness. This ensures they cook at the same rate and prevents dryness.
2. Don’t Skip the Seasoning
Simple seasonings go a long way. Generously sprinkle both sides of the chicken with salt, black pepper, garlic powder, and paprika. These spices enhance the chicken’s natural flavor and create a savory base that balances the rich honey mustard sauce.
3. Sear Before You Bake
Searing the chicken on the stovetop helps create a golden crust that locks in the juices. Heat a bit of oil or butter in your oven-safe skillet and cook each side for 2–3 minutes. This step not only boosts flavor but also seals in moisture before baking.
4. Bake at the Right Temperature
Oven temperature matters more than you might think. Bake the chicken at 375°F (190°C) to cook it through without drying it out. Too hot, and it may overcook quickly. Too cool, and it may turn rubbery. Use a meat thermometer to pull the chicken at 165°F (74°C)—the sweet spot for moist, perfectly done meat.
5. Let It Rest Before Cutting
Once it’s out of the oven, let the chicken sit for at least 5 minutes before serving. Resting gives the juices time to redistribute, so they stay in the meat instead of running out onto the plate. This small step makes a big difference in texture and taste.
6. Layer Sauce and Toppings for Moisture Retention
The honey mustard sauce, bacon, and cheese don’t just add flavor—they also help keep the chicken moist during baking. The sauce locks in steam, the cheese insulates the meat, and the bacon adds a fat layer that keeps everything tender underneath.
Following these steps will help you create juicy, flavorful chicken that becomes the star of your Alice Springs Chicken dish. It’s all about technique, temperature, and timing.
Monitoring and Adjusting
While baking your Alice Springs Chicken, monitoring and adjusting cooking time and temperature ensures that everything turns out perfectly. Small tweaks during the cooking process can help you achieve a juicy, tender chicken with golden, melted cheese and crispy bacon every time.
1. Check for Even Cooking with a Meat Thermometer
A meat thermometer is your best tool for ensuring your chicken is cooked perfectly. Insert the thermometer into the thickest part of the chicken breast. When it reaches 165°F (74°C), the chicken is safe to eat and perfectly cooked. This step is essential for preventing dry, overcooked meat.
2. Adjust Cooking Time Based on Chicken Thickness
Not all chicken breasts are the same size. If your chicken breasts are particularly thick, they may need a few extra minutes in the oven. Conversely, thinner breasts may cook more quickly. Keep an eye on the chicken as it bakes, checking the internal temperature at the thickest part.
3. Watch for Over-Browning
During baking, keep an eye on the chicken’s surface. If the bacon or cheese starts to brown too quickly, you can cover the dish with foil for a few minutes to prevent burning. Once the cheese is bubbly and the chicken reaches the proper temperature, uncover it to allow the cheese to finish melting and the bacon to crisp up without overcooking.
4. Adjust Oven Temperature If Needed
Every oven behaves a little differently. If you find that your chicken is cooking unevenly, or if it seems to be drying out, consider adjusting the oven temperature by 10–15 degrees. You can lower the temperature slightly to ensure even cooking or increase it if the dish is taking longer than expected. Oven temperature fluctuations can affect cooking time, so always monitor progress and make adjustments as needed.
5. Add a Final Touch of Broiling (Optional)
If you like your cheese extra bubbly or slightly golden, switch your oven to broil for the last 1–2 minutes of cooking. Keep the dish in full view, as broiling can brown the cheese quickly. This extra step creates that perfect crispy texture on top while ensuring the inside remains juicy and tender.
6. Rest After Baking
Once you remove the dish from the oven, let it rest for 5–10 minutes. This allows the juices to redistribute throughout the chicken, making it even more flavorful and tender. It also helps the cheese and sauce thicken slightly, making the overall dish more cohesive.
By monitoring and adjusting throughout the cooking process, you can avoid overcooking, undercooking, or burning your Alice Springs Chicken. These small adjustments ensure a perfect, juicy result every time, with all the flavors melding together beautifully.
Using the One-Pan Method
The one-pan method is a game changer when it comes to making Alice Springs Chicken. This approach not only simplifies cooking but also minimizes cleanup, making it an ideal solution for busy weeknights or casual gatherings. Here’s why using one pan from start to finish ensures a flavorful and hassle-free meal.
1. Sear and Bake in the Same Pan
The beauty of the one-pan method lies in its simplicity. You start by searing the chicken in the same oven-safe pan that you’ll use for baking. Searing adds flavor by caramelizing the chicken’s surface, locking in juices, and forming a delicious crust. Once the chicken is seared, there’s no need to transfer it to another dish—just layer on the toppings and slide the whole pan into the oven. This step saves time and prevents the need for extra cleanup.
2. Lock in Flavors and Juices
Cooking everything in one pan means that all the flavors from the bacon, cheese, and sauce mingle with the chicken as it bakes. The chicken absorbs the smokiness from the bacon, the creaminess of the cheese, and the tangy-sweetness of the honey mustard sauce. This efficient method ensures that nothing goes to waste, and every ingredient contributes to the overall flavor profile of the dish.
3. Perfectly Layered for Optimal Cooking
In a one-pan setup, layering ingredients properly can make a big difference. After searing the chicken, start by spreading the honey mustard sauce over each piece. Then, add the crispy bacon and finish with a generous layer of cheese. This order allows each element to do its job: the sauce keeps the chicken moist, the bacon adds crunch, and the cheese creates that gooey, golden topping. By placing the cheese last, it has the perfect amount of time to melt and bubble without burning.
4. Reduce Cleanup Time
One of the main benefits of the one-pan method is less mess. When cooking traditional meals, multiple pans, trays, and utensils are often required. With Alice Springs Chicken, all you need is your oven-safe skillet or baking dish. After dinner, you’ll only have one pan to clean, making the whole process more efficient and less stressful.
5. Versatile for Different Cooking Styles
The one-pan method is adaptable to your preferred cooking style. Whether you’re using a cast iron skillet, a nonstick pan, or a stainless steel oven-safe dish, this method works well with various types of cookware. A cast iron skillet, for example, can enhance the flavor due to its ability to hold heat and create a beautifully seared chicken. For a lighter, less greasy meal, a nonstick pan can make cleanup even easier while still yielding delicious results.
6. Cook More Than Just Chicken
The beauty of the one-pan method extends beyond Alice Springs Chicken. Once you master this approach, you can experiment with other dishes like baked chicken thighs, roasted vegetables, or even casseroles. You can easily adjust the cooking times depending on the ingredients, making the one-pan method a versatile tool in your kitchen.
Using the one-pan method for Alice Springs Chicken simplifies both the cooking and cleanup process while enhancing the flavors of the dish. The combination of convenience and taste makes this approach a winner for any home cook.
Serving, Variations, and Final Tips

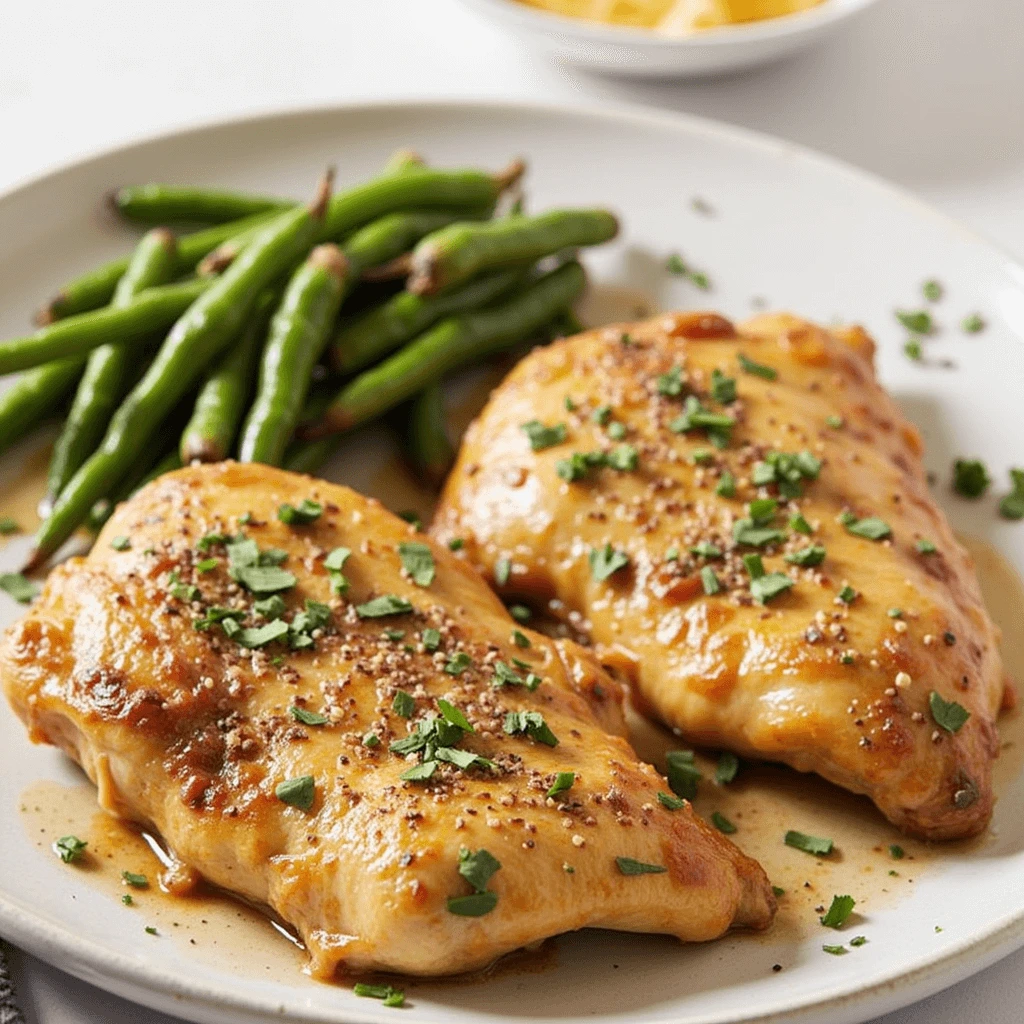
Plating and Presentation Ideas
While the taste of Alice Springs Chicken is undoubtedly the star of the meal, its visual appeal shouldn’t be overlooked. Beautiful presentation elevates the dining experience and makes your dish even more enticing. Here are some tips and ideas for plating your Alice Springs Chicken in a way that showcases its rich flavors and textures.
1. Serve on a Warm Plate
Start with a warm plate. Preheat your plates by placing them in the oven for a few minutes or running warm water over them before drying. This simple step helps keep your chicken hot while adding a touch of elegance to the presentation.
2. Center the Chicken for a Focal Point
When plating Alice Springs Chicken, place the chicken breast in the center of the plate as the focal point. Arrange it slightly off-center if you’re pairing it with a side dish, like roasted vegetables or mashed potatoes, to create a balanced, inviting look. The melted cheese and crispy bacon should be the first things your guests notice.
3. Add Color with Fresh Garnishes
Fresh herbs not only enhance the flavor but also brighten up your plate. A sprinkle of chopped parsley, fresh thyme, or rosemary adds a pop of green and a burst of freshness. You could also use finely chopped chives for a mild onion flavor or microgreens for a more upscale look. These garnishes create contrast and draw attention to the beauty of the dish.
4. Complement with Side Dishes
Pair your Alice Springs Chicken with sides that complement its rich and savory flavors. Roasted vegetables, such as carrots, asparagus, or Brussels sprouts, can add color and texture to the plate. For a lighter contrast, consider a fresh salad with a tangy vinaigrette. Serve mashed potatoes, rice pilaf, or a grain like quinoa on the side for a heartier meal. Arrange the sides thoughtfully around the chicken to create a balanced plate.
5. Create Texture with a Drizzle of Sauce
Once the chicken is plated, drizzle a bit of the honey mustard sauce around the plate or over the chicken to add extra flavor and visual appeal. You can even create a decorative pattern with the sauce—like a swirl or a dash of artistic flair. This adds both a touch of elegance and extra flavor to each bite.
6. Use a Platter for Family-Style Serving
If you’re serving Alice Springs Chicken for a group, a large serving platter works well. Arrange the chicken breasts neatly on the platter and drizzle them with the sauce. Garnish with fresh herbs and a sprinkle of shredded cheese on top for an eye-catching presentation. Family-style service allows guests to enjoy the dish in a communal way, making the meal feel even more special.
7. Add a Touch of Contrast with Colorful Accents
Consider adding color to the plate by pairing the chicken with a vibrant salad or roasted vegetables. For instance, a side of roasted red bell peppers or a vibrant beet salad offers a nice contrast against the golden cheese and bacon, drawing the eye to the dish. These colorful accents provide visual balance and help highlight the beautiful textures of the chicken.
8. Serve with a Beverage Pairing
For the final touch, consider recommending a wine or beverage pairing to go with the dish. A chilled glass of white wine like Chardonnay or a refreshing iced tea can elevate the overall dining experience. Placing the drink next to the plate or subtly suggesting it adds a polished touch to your meal presentation.
By paying attention to plating and presentation, you make your Alice Springs Chicken not only a treat for the taste buds but also an aesthetically pleasing experience for your guests. Thoughtful garnishes, careful arrangement, and attention to detail transform a simple meal into something extraordinary.
Recipe Variations
One of the best things about Alice Springs Chicken is how easy it is to customize. Whether you’re adjusting for dietary needs, personal preferences, or available ingredients, there are plenty of ways to adapt the classic recipe without sacrificing flavor. Here are several creative variations to keep the dish fresh and exciting every time you make it.
1. Low-Carb or Keto-Friendly Alice Springs Chicken
To make this dish low in carbs, skip the honey in the mustard sauce or replace it with a sugar-free alternative like monk fruit sweetener or keto maple syrup. You can also swap the honey mustard sauce with a creamy garlic butter or a keto ranch dressing for a different, equally rich flavor. Serve it with a side of sautéed spinach, cauliflower rice, or zoodles for a fully keto-approved meal.
2. Gluten-Free Version
Alice Springs Chicken is naturally close to gluten-free, but it’s important to double-check your ingredients. Use a certified gluten-free mustard and bacon (some brands may include gluten-containing additives). If you’re using a store-bought sauce or seasoning blend, ensure those are labeled gluten-free. This small attention to detail makes the dish safe and enjoyable for anyone with gluten sensitivities or celiac disease.
3. Grilled Alice Springs Chicken
Want to skip the oven altogether? Try a grilled version of Alice Springs Chicken. Start by grilling the seasoned chicken breasts until fully cooked. Then, layer on the honey mustard sauce, bacon, and cheese, and cover the grill briefly to melt the toppings. The result is a smoky, char-grilled version that still delivers on flavor with a slightly crispier texture.
4. Dairy-Free Adaptation
For those avoiding dairy, swap out the cheese for a plant-based alternative that melts well, like a vegan cheddar-style cheese. The honey mustard sauce can also be made dairy-free by using vegan mayo and skipping any cream-based additions. These swaps still give you a creamy, indulgent texture without the dairy.
5. Vegetarian Twist
If you’re looking for a meatless version, try replacing the chicken with hearty vegetables or plant-based alternatives. Thick slices of roasted portobello mushrooms or tofu steaks can serve as your base. Brush them with the sauce, add veggie bacon (or omit it), and top with your preferred plant-based cheese. It’s a satisfying option for vegetarians that still captures the essence of the dish.
6. Spicy Kick Version
Turn up the heat by adding a dash of cayenne pepper or a squirt of Sriracha to your honey mustard sauce. You can also top the dish with chopped jalapeños or use pepper jack cheese for extra spice. This version is perfect for those who enjoy a little heat with their savory dishes.
7. Family-Friendly or Kid-Approved Modifications
If you’re cooking for picky eaters, you can make a milder version of the sauce by using just honey and yellow mustard (instead of spicy brown or Dijon mustard). Use mild cheddar cheese and skip any strong herbs. Serve it with kid-friendly sides like mashed potatoes or corn on the cob for a meal the whole family will love.
8. Mini Chicken Skillet Bites
For a fun appetizer or party version, cut the chicken into bite-sized pieces and cook them in a skillet. Top each piece with a dab of sauce, a crumble of bacon, and a sprinkle of cheese. Serve them on toothpicks or skewers for a crowd-pleasing appetizer that still gives guests the full Alice Springs Chicken experience—just in miniature form.
Whether you’re sticking to the classic or experimenting with different ingredients, these variations keep Alice Springs Chicken exciting and adaptable. There’s something for everyone, no matter your dietary preference or cooking style.
Frequently Asked Questions
If you’re new to making Alice Springs Chicken or simply want to perfect your technique, you’re not alone. Below are answers to some of the most commonly asked questions about this savory, one-pan favorite.
Q: What is Alice Springs Chicken, and where did it originate?
Alice Springs Chicken is a popular dish made famous by Outback Steakhouse. It features juicy chicken breasts topped with honey mustard sauce, crispy bacon, and melted cheese. The name is inspired by Alice Springs, a town in the Australian Outback, although the dish itself is more of an American-Australian fusion than an authentic Australian meal.
Q: Can I make Alice Springs Chicken ahead of time?
Yes! You can prep the chicken, sauce, and toppings in advance. Simply store them in separate containers in the fridge. When ready to cook, assemble everything in the pan and bake as usual. This make-ahead method is perfect for meal prepping or entertaining guests without the last-minute rush.
Q: What sides pair well with Alice Springs Chicken?
Classic side dishes like roasted vegetables, mashed potatoes, or garlic green beans pair beautifully with Alice Springs Chicken. If you prefer something lighter, try a fresh garden salad or steamed broccoli. The richness of the dish balances well with crisp, colorful sides.
Q: How do I store leftovers, and how long will they last?
Store leftovers in an airtight container in the refrigerator for up to 3 to 4 days. When reheating, use the oven or an air fryer to keep the bacon crispy and the cheese gooey. Avoid microwaving if possible, as it can make the texture rubbery.
Q: Can I freeze Alice Springs Chicken?
Yes, but for best results, freeze the chicken and sauce separately from the toppings. Cheese and bacon may not reheat well if frozen directly on the chicken. Wrap the chicken tightly in plastic wrap or foil and store in a freezer-safe container for up to 2 months. Thaw in the fridge overnight before reheating.
Q: Can I use chicken thighs instead of chicken breasts?
Absolutely. Chicken thighs are a great alternative, especially if you prefer dark meat. They tend to be juicier and more flavorful. Just be sure to adjust the cooking time, as thighs may take a bit longer in the oven depending on thickness.
Q: Is this dish spicy? Can I adjust the heat level?
The traditional Alice Springs Chicken is not spicy. However, you can easily customize the heat level. Add cayenne pepper, jalapeños, or spicy mustard to the sauce if you want a kick. To keep it mild, stick with yellow mustard and skip the spicy toppings.
Q: What type of cheese works best?
The classic version uses Monterey Jack or Colby Jack cheese. Both melt beautifully and complement the flavors of the honey mustard sauce and bacon. You can also try cheddar, mozzarella, or even a blend of cheeses if you want to mix things up.
Q: Can I make a healthier version of this recipe?
Yes! Use lean chicken breasts, low-sugar mustard, and light cheese or dairy-free options. You can also bake instead of pan-frying to reduce oil. Serve it with low-carb or veggie-based sides like cauliflower rice or zucchini noodles to keep things light.
This FAQ section aims to cover everything you need to make Alice Springs Chicken with confidence. Still have questions? Feel free to drop them in the comments or contact us directly!
Encouraging Reader Engagement
Creating a delicious Alice Springs Chicken recipe is just the beginning—building a community of enthusiastic home cooks is what brings your blog to life. Reader engagement isn’t just about comments; it’s about inviting people into a conversation, learning from each other, and celebrating good food together. Here’s how you can encourage readers to connect and share their experiences:
1. Invite Readers to Share Their Own Versions
Encourage your readers to make the recipe their own. Ask them to leave a comment about any substitutions they tried, whether they used chicken thighs instead of breasts, or added a spicy twist to the sauce. Let them know you’re excited to hear how they personalized their dish. Phrases like “What would you do differently next time?” or “Have you ever tried this with grilled chicken?” open the door for interaction.
2. Ask Specific, Easy-to-Answer Questions
At the end of your blog post, include a couple of simple questions to prompt discussion. For example:
- Did you try this Alice Springs Chicken recipe at home?
- Which side dish did you pair it with?
- Have you ever eaten the original at Outback? How does this version compare?
These questions make it easier for readers to jump into the conversation and feel heard.
3. Encourage Photo Sharing on Social Media
Let your readers know you’d love to see their results! Prompt them to tag your account or use a branded hashtag when posting photos on Instagram, Facebook, or Pinterest. For example:
“Made this dish? Tag us @YourBlogName and use #MyAliceSpringsChicken—we’d love to feature your creation!”
This not only boosts engagement but also creates user-generated content that strengthens your blog’s visibility and credibility.
4. Offer a Printable Recipe Card or PDF Download
Giving readers a simple, printable version of the recipe makes their cooking process easier and adds value to your post. You can ask them to leave a comment if they want the PDF version emailed directly—this not only boosts engagement but also grows your email list in the process.
5. Create a Sense of Community
Invite readers to join your newsletter, follow you on social media, or participate in monthly cooking challenges. When people feel part of a group, they’re more likely to return, comment, and interact with your future content. Even a short sign-off like “Thanks for being here—your comments inspire me to keep cooking and sharing!” can go a long way.
6. Respond to Comments Promptly and Personally
Engagement is a two-way street. When readers take the time to leave a comment or ask a question, reply promptly with a warm, personal message. Whether they’re asking about cooking time or just raving about the cheese, your response shows that you value their presence.
By encouraging feedback, inviting creativity, and building a sense of community, your Alice Springs Chicken recipe post becomes more than a meal—it becomes a conversation. The more you engage with readers, the more they’ll come back, share, and connect with your culinary content.
Conclusion
Alice Springs Chicken is more than just a hearty one-pan meal—it’s a flavorful, comforting dish that brings restaurant-style quality right to your kitchen. Whether you’re recreating it for a nostalgic Outback Steakhouse night or trying it for the first time, this recipe is sure to impress with its savory honey mustard sauce, crispy bacon, and gooey melted cheese.
With the tips, variations, and step-by-step guidance we’ve shared, you can make this dish your own and enjoy it any night of the week. Plus, the one-pan approach makes cleanup a breeze—win-win!
We hope this post has inspired you to give it a try. Don’t forget to share your version in the comments, let us know how it turned out, or tag us on social media with your delicious results. Your feedback not only helps others—it helps us create even better recipes for the community.
Happy cooking, and thanks for being part of our food-loving family!